SequelizeJS Tutorial with Node: Popular Object-relational mapping (ORM)

Background
Object Relational Mapping (ORM) is the process of mapping between objects and relational database systems. So it acts like an interface between two systems hiding details about an underlying mechanism. In this versatile world, database systems are also not 100% alike—the way of accessing data differs. When it comes to migration between databases, ORM could be an option if you want to avoid wasting time and effort. Here are some advantages of ORM over the traditional query approach:
- Developers can only focus on business logic rather than writing interfaces between code and DB.
- Reduces development time and costs by avoiding redundant codes
- Capable of connecting to different databases, which comes in handy during switching from one DB to the other.
- Helps to effectively query from multiple tables similar to SQL JOIN—ORM takes the responsibility of converting the object-oriented query approach to SQL queries.
Introduction
In this article, we will learn how to make an effective object-relational mapping with Sequelize in Node.js. There are a couple of other alternatives but this module is my favorite. Sequelize is easy to learn and has dozens of cool features like synchronization, association, validation, etc. It also has support for PostgreSQL, MySQL, MariaDB, SQLite, and MSSQL.
How to start?
So our objective here is to understand its functionality by creating a sample application that will perform some basic operations with CRUD. I assume you have Node.js and PostgreSQL installed.
Starter app
Let’s use the “express application generator” to create a starter application.
pm install express-generator -g
express testapp
To install sequelize, Postgres, and ejs (template engine), navigate to the root of your generated folder.
nm install --save sequelize
npm install --save pg pg-hstore
npm install --save ejs
We will use EJS for templating instead of Jade. So we can remove Jade-related dependencies and files from the default Express-generated project.
DB connection and models
Connecting to Postgres is as easy as a single line
var sequelize = new Sequelize('postgres://username:password@localhost:5432/db_name');
Models are the objects which represent tables in a database. They are the heart of ORM and we can define them with sequelize.define. Our User model looks like this:
var User = sequelize.define('user', {
	firstName: {
		type: DataTypes.STRING,
		allowNull: false,
		unique: 'compositeIndex'
	},
	lastName: {
		type: DataTypes.STRING,
		unique: 'compositeIndex'
	},
	.........
	.........
	.........
	dateJoined: {
		type: DataTypes.DATE,
		defaultValue: DataTypes.NOW
	}
}, {
	getterMethods: {
		address: function() {
			return this.state + ', ' + this.country
		}
	},
	setterMethods: {
		address: function(value) {
			var names = value.split(', ');
			this.setDataValue('country', names[0]);
			this.setDataValue('state', names[1]);
		},
	}
});
You just need to define the columns and their data types and Sequelize will automatically add createdAt and updatedAt to your model. There are a few other settings you can also configure for your columns.
- allow all — Set false if null is not allowed
- defaultValue — Set a default value for a column.
Example:DataTypes.NOWfordateJoinedcolumn. - autoIncrement — Automatically increments the column by one every time a new row is inserted
- comment — Mention a comment for your column
- unique — Mention a boolean true to define a column as unique. For a composite key, a string can be mentioned for multiple columns.
Example
userId: {type: Sequelize.STRING, unique: true},
fullName: { type: Sequelize.STRING,  unique: 'compositeIndex'},
dob: { type: Sequelize.DATE, unique: 'compositeIndex'}
Getter and setter methods
In Sequelize, we can define pseudo properties on a model. These properties are not an actual part of the database schema, they are just for the models. In the example above, “address” is a pseudo-property, and its value is initialized through getter and setter methods. When state and country are fetched from DB, Sequelize merges them with a comma to populate the “address” property (getter methods). Similarly, when we set the address, it gets split into state and country (setter methods). Thus, the “address” seems like a column in DB but it’s not.
Preparing sample data
There are different approaches to creating a new entry in DB. The first approach is to build a nonpersistent object and then call save() to persist the data.
var newUser = user.build({
	firstName: 'John',
	lastName: 'Doe',
	age: 28,
	country: 'US',
	state: 'Indiana',
	email: '[email protected]'
});
newUser.save().then(function() {
	// Do stuffs after data persists
})
Another alternative is to do both the steps in a single line using user.create({.....}).then(function(user) {}). If we need to create bulk instances, here’s how we do it.
user.bulkCreate([USERS], {
	validate: true
}).then(function() {
	// Congratulate user!
}).catch(function(errors) {
	// Catch  if validation failed
	// Print errors
});
Check ./routes/createData.js in the sample project for the bulk creation logic. Go with the steps localhost:3000 to see the operations live as we discuss further.
Querying data
We can query data using findAll and findOne which takes additional parameters like attributes, where conditions, ordering, and pagination. Let’s learn these through examples.

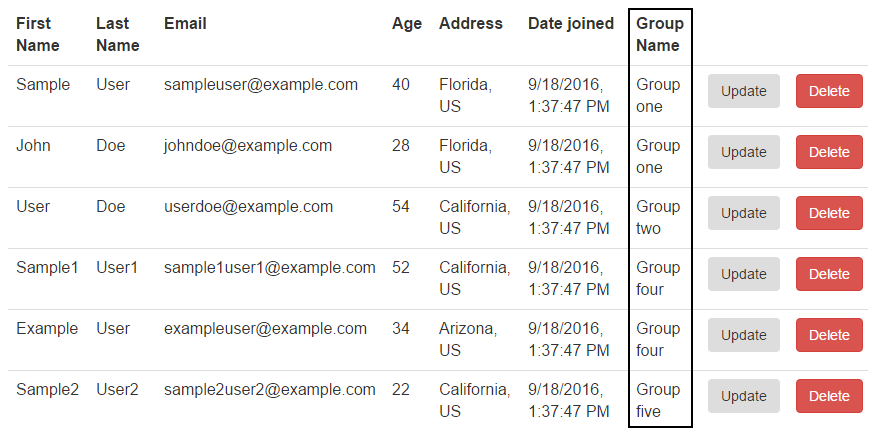
Get the first 100 user instances. The highlighted column in the image above comes from the “group” table.
user.findAll({limit: 100}).then(function(users) {
// Send array to view
});
Get user by email
user.findOne({where : {email: '[email protected]'}}).then(function(user) {
// Send user to view
});
A little more complex example. Find all users of California and Arizona whose age is between 20 and 40 and whose last name contains ‘user’.
var query = {};
query.where = {
	$or: [{
			state: "California"
		},
		{
			state: "Arizona"
		}
	],
	age: {
		$between: [20, 40]
	},
	lastName: {
		$ilike: '%user%'
	}
};
user.findAll(query).then(function(users) {
	// Do something awesome here
});
SELECT "id", "firstName", "lastName", "email", "age", "country", "state", "dateJoined", "createdAt", "updatedAt"
FROM "user"
AS "user"
WHERE("user".
"state" = 'California'
OR "user".
"state" = 'Arizona')
AND "user".
"age"
BETWEEN 20 AND 40
AND "user".
"lastName"
ILIKE '%user%';If you need more operators for querying data, you can find the list on the net.
Sequelize also offers an option to directly provide SQL queries, like:
squelize.query(QUERY, { model: user }).then(function(users) {
// Array of instance of user
})
Updates and destroy
Updating an instance can take two parameters, the updated values and where condition.
user.update({
		firstName: "John",
		lastName: "Doe",
		address: "Nevada, US"
	}, {
		where: {
			email: "[email protected]"
		}
	})
	.then(function() {

	});
“Destroy” also takes a where condition (Check below). You can also follow the callback syntax (just like update) to do some logic after destroying.
user.destroy({
	where: {
		email: '[email protected]'
	}
});
// DELETE FROM user WHERE email = '[email protected]';
Relation and associations
In this section, we will learn about one-to-one associations. When two models are linked to each other by a single foreign key, we say it is a one-to-one association. In our case, we have two models: user and group. Each user is associated with a single group. So the user model has a foreign key group_id that points to groupIdthe group model. Defining this association is very easy in Sequelize.
user.belongsTo(group, {foreignKey: 'group_id', targetKey: 'groupId'});
Once the line above is executed, it creates a foreign key “group_id” for the group model. To read the data from both tables (like joining in SQL), simply include the target model as follows:
user.findAll({
	limit: 100,
	include: [{
		model: group
	}]
}).then(function(users) {
	// Send users to view
});
Wrapping up
There are more features in Sequelize, such as transaction management, hooks, scopes, etc. Combining all these features Sequelize becomes a strong ORM module for Node.js. But when it comes to complex relations and associations, it seems a little dimmed and maintainability could be a concern. But other than that it is a bullet-proof module with well-described documentation.
FAQ's
How long will it take to learn node JS?
If you already have a strong programming background and you are familiar with JavaScript, you can learn Node. js in a few days. If you have good development experience but no knowledge of JavaScript (the programming language of Node. js), it may take around 2-6 weeks to learn Node.
Is node JS easy to learn?
Aside from being one of the most popular programming languages on the planet, JavaScript is powerful and easy to learn (though sometimes difficult to master). And Node is, among other things, JavaScript on the server.
Is node js in demand?
Node.js is majorly used for creating data-intensive real-time IoT applications and devices. According to Statista, based on their early 2020 research they found Node. js to be the most desirable by at least 18.1% of the respondents.