Z-Image Turbo: Install Guide & FLUX vs DALL-E Comparison
Complete Z-Image Turbo installation guide with benchmarks, pricing ($0.005/image), and detailed comparison vs FLUX, DALL-E 3, and Midjourney. Bilingual text rendering & 2.3s generation on RTX 4090.
Z-Image Turbo represents a breakthrough in AI-powered image generation, delivering photorealistic quality at unprecedented speeds. Released by Alibaba's Tongyi Lab in November 2025, this 6-billion parameter model has rapidly climbed to #4 on the AI Arena leaderboard with an Elo score of 1026—making it the highest-ranked open-source image model available today.
In just its first day, Z-Image Turbo achieved over 500,000 downloads on Hugging Face, signaling massive adoption by developers and creative professionals worldwide.
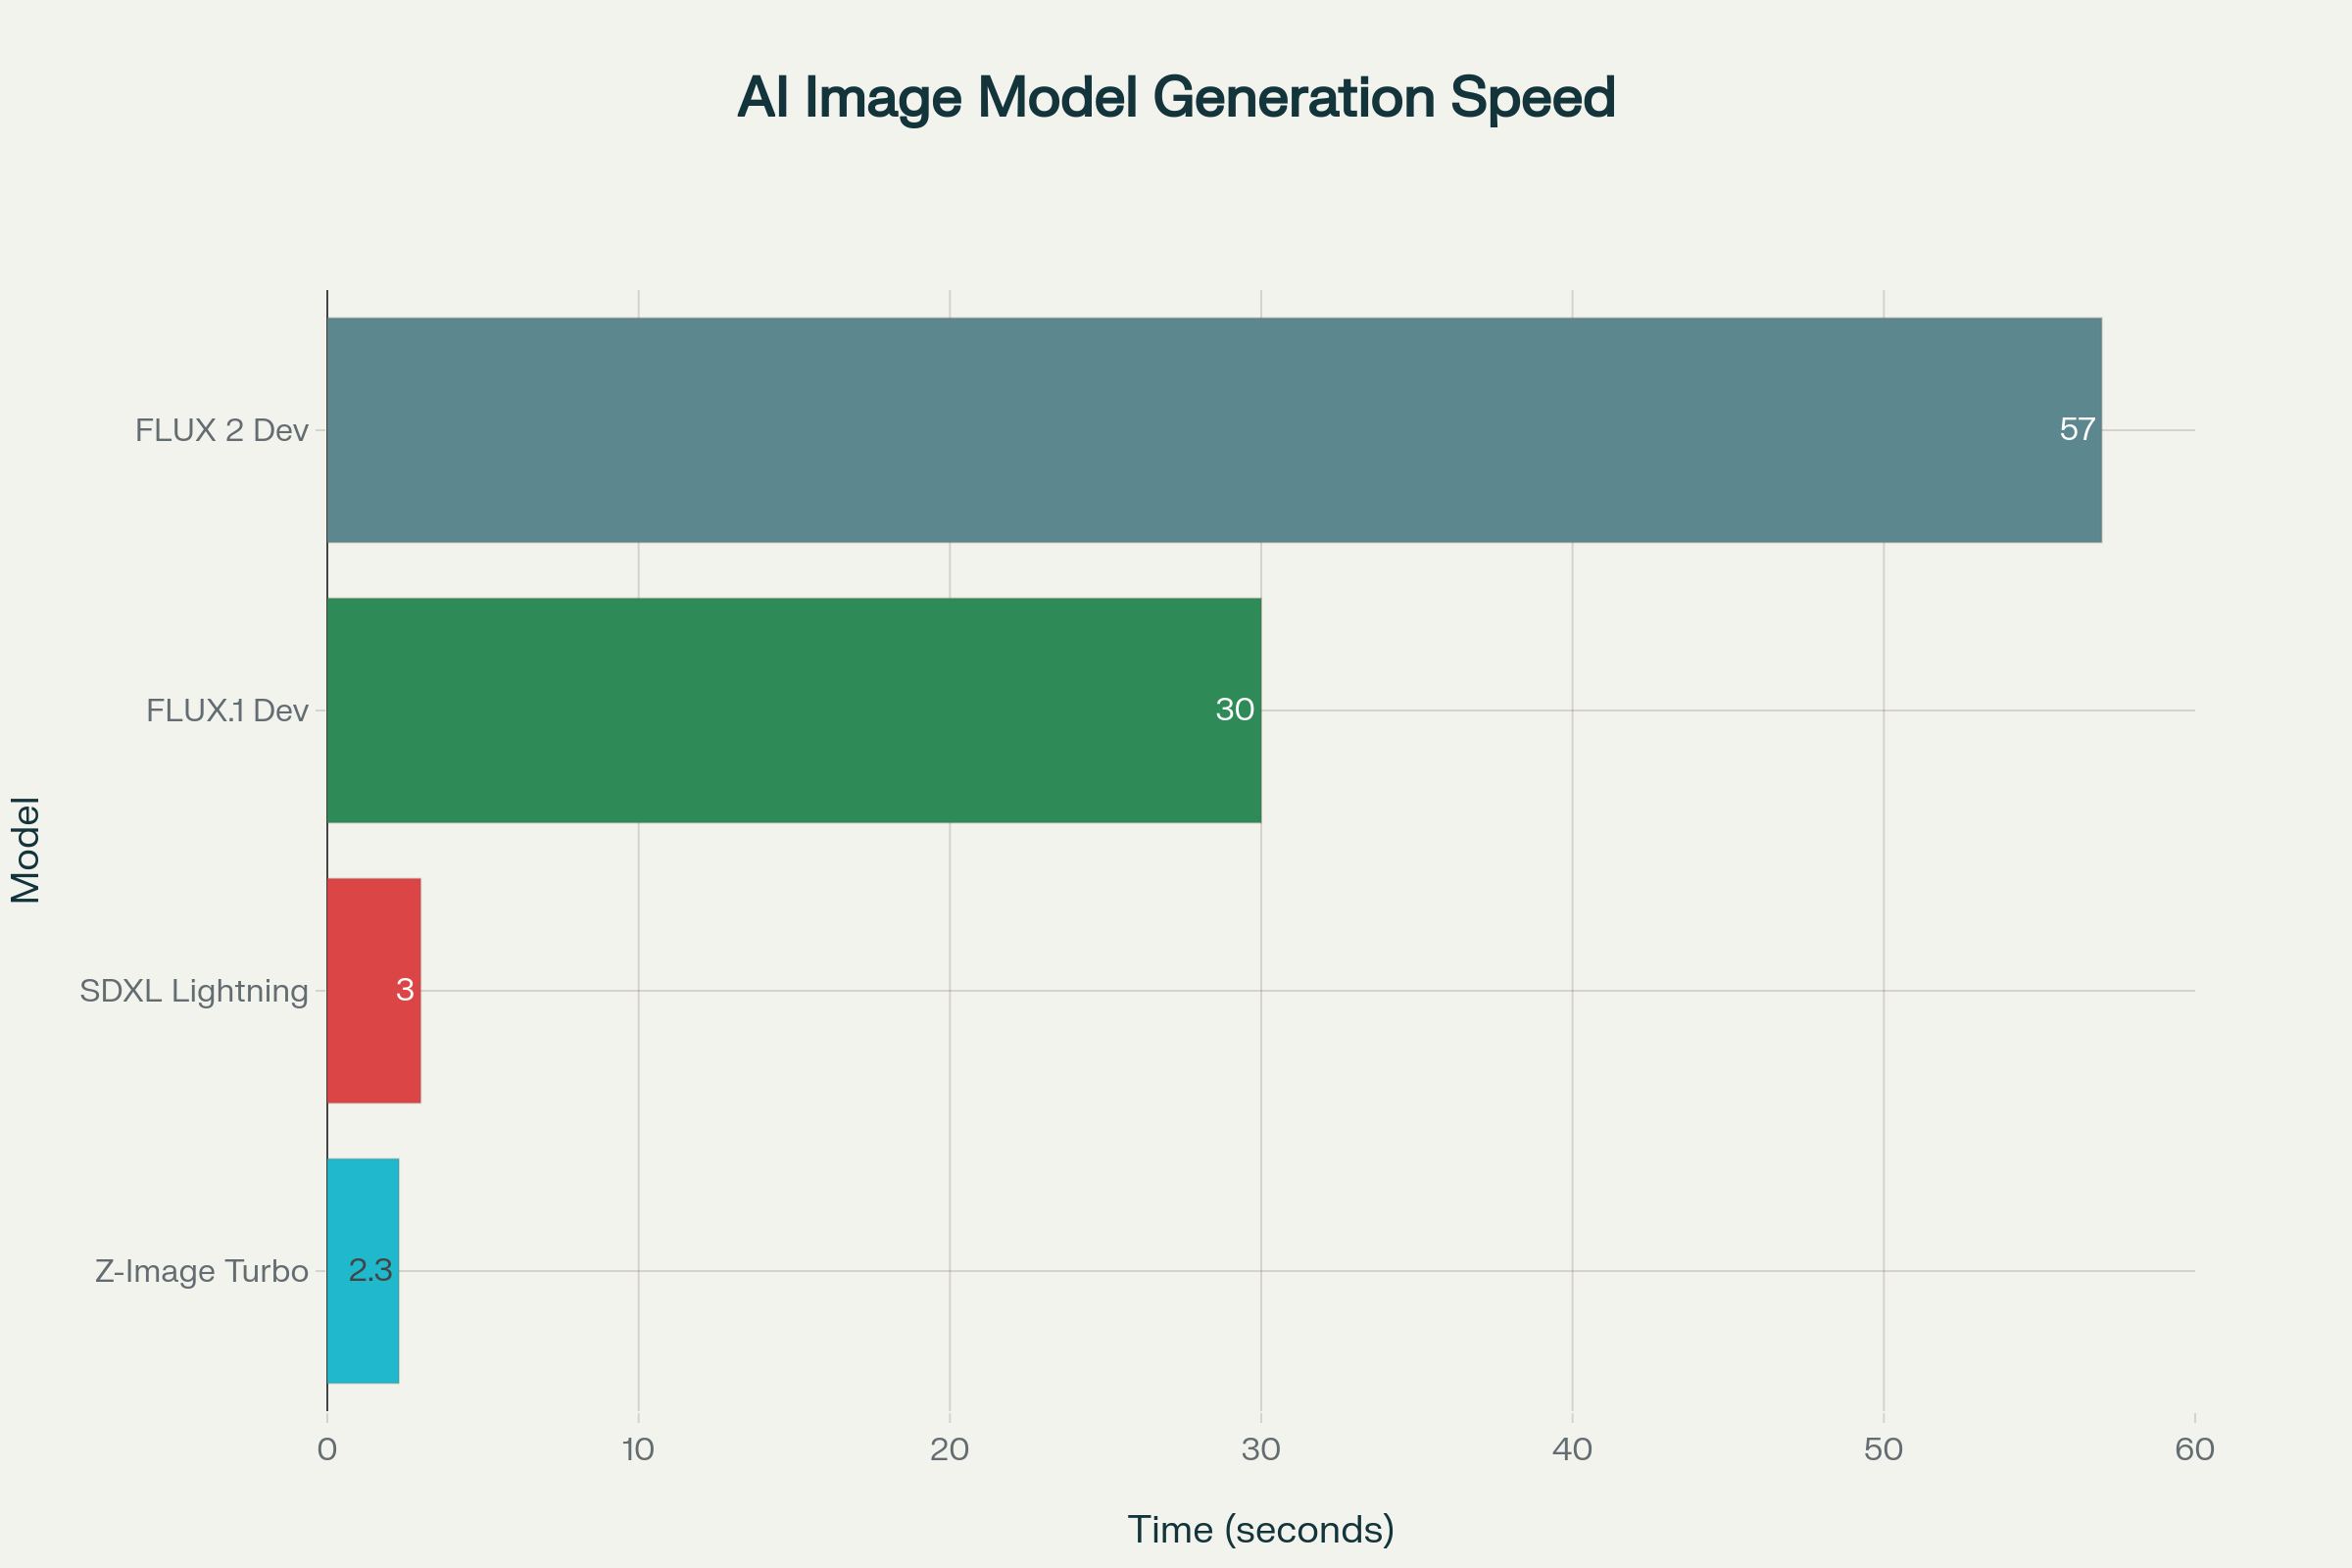
What makes Z-Image Turbo truly remarkable is its efficiency: it generates 1024×1024 photorealistic images in just 2.3 seconds on an RTX 4090, compared to 57 seconds for FLUX.1 Dev.
This guide covers everything you need to know—from installation and configuration to real-world testing, pricing, and how it stacks up against competitors like FLUX, Midjourney, and DALL-E.
Understanding Z-Image Turbo
The S3-DiT Architecture Revolution
Z-Image Turbo employs a Scalable Single-Stream Diffusion Transformer (S3-DiT) architecture that fundamentally differs from traditional dual-stream approaches. In this design, text tokens, visual semantic tokens, and image VAE tokens are concatenated at the sequence level to form a unified input stream. This architectural choice maximizes parameter efficiency—achieving results comparable to commercial models that are 3× larger (20B+ parameters).
The single-stream approach offers several advantages:
- Reduced computational overhead by eliminating dual-stream processing
- Better parameter utilization since the same network handles both language and image reasoning
- Simplified optimization for deployment on consumer hardware
Decoupled-DMD: The Speed Secret
The exceptional speed of Z-Image Turbo comes from Decoupled Distribution Matching Distillation (Decoupled-DMD). This distillation technique separates two critical mechanisms:
CFG Augmentation (CA) acts as the primary engine driving the distillation process, a factor previously overlooked in similar methods. Distribution Matching (DM) serves as a regularizer ensuring output stability and quality. By recognizing and optimizing these mechanisms independently, Alibaba's team created a model that achieves exceptional results in just 8 NFEs (Number of Function Evaluations).
DMDR: Fusing Distillation with Reinforcement Learning
Building on Decoupled-DMD, Z-Image Turbo incorporates DMDR (Distribution Matching Distillation with Reinforcement). This technique adds feedback signals resembling reinforcement learning, where scores based on human preference, structure, or aesthetics guide training while distribution matching keeps updates regularized. The result: sharper details and better semantic alignment without increasing sampling steps.
System Requirements and Hardware Specifications
Minimum Hardware Requirements
Z-Image Turbo is designed with accessibility in mind, running comfortably on consumer-grade hardware:
| Component | Minimum | Recommended |
|---|---|---|
| GPU VRAM | 8 GB | 16 GB |
| GPU Model | RTX 3060 6GB | RTX 4090 / RTX 3090 |
| Python | 3.9+ | 3.10+ |
| CUDA | Compatible version | CUDA 12.4 |
| RAM | 16 GB | 32 GB |
| Storage | 10 GB free | 20 GB+ SSD |
The model operates exceptionally well on the RTX 30/40 series, with the FP8 checkpoint consuming approximately 6 GB of storage.
Performance Across Different GPUs
Real-world testing reveals impressive performance scaling:
| GPU | Resolution | Steps | Generation Time |
|---|---|---|---|
| NVIDIA H800 (Enterprise) | 1024×1024 | 8 | Sub-second |
| RTX 4090 | 1024×1024 | 8 | 2.3 seconds |
| RTX Pro 6000 Blackwell | 2048×2048 | 8 | 4.8 seconds |
| RTX 3090 | 1024×1024 | 8 | 10 seconds |
| RTX 3060 12GB | 1024×1024 | 7 | 20 seconds |
| RTX 3060 6GB | 1024×1024 | 8 | 40-70 seconds |
Step-by-Step Installation Guide
Method 1: Python/Diffusers Installation (Recommended for Developers)
Step 1: Create a Virtual Environment
bashpython -m venv zimage-envsource zimage-env/bin/activate # On Windows: zimage-env\Scripts\activate
Step 2: Install PyTorch and Dependencies
bashpip install torch --index-url https://download.pytorch.org/whl/cu124pip install git+https://github.com/huggingface/diffuserspip install transformers accelerate safetensors
Step 3: Load the Z-Image Pipeline
pythonimport torchfrom diffusers import ZImagePipelinepipe = ZImagePipeline.from_pretrained(
"Tongyi-MAI/Z-Image-Turbo",
torch_dtype=torch.bfloat16,
low_cpu_mem_usage=False,
)
pipe.to("cuda")
Step 4: Generate Your First Image
pythonprompt = "City street at night with clear bilingual store signs, warm lighting, and detailed reflections on wet pavement."
image = pipe(
prompt=prompt,
height=1024,
width=1024,
num_inference_steps=9, # Results in 8 DiT forwards
guidance_scale=0.0, # Must be 0 for Turbo models
generator=torch.Generator("cuda").manual_seed(123),
).images[0]
image.save("z_image_turbo_city.png")
Method 2: ComfyUI Installation (Recommended for Artists)
ComfyUI offers a visual node-based workflow ideal for iterative creative work:
Step 1: Download Required Files
- Download the FP8 model variant from CivitAI or HuggingFace (BF16 may produce black images)
- Download the Qwen 3B CLIP file for text encoding
- Obtain the ComfyUI workflow file
Step 2: Place Model Files
- Place the FP8 checkpoint in
ComfyUI/models/checkpoints/ - Place CLIP files in
ComfyUI/models/clip/ - Place VAE in
ComfyUI/models/vae/
Step 3: Configure the Workflow
The workflow includes these essential nodes:
- Diffusion Model: Core checkpoint for image generation
- KSampler: Set steps to 8 for optimal speed-quality balance
- CLIP Node: Set to Lumina 2 backed by Qwen 3B CLIP file
- Empty Latent Image: Creates starting latent for sampling
- VAE Decode: Converts latent to RGB image
Step 4: Generate Images
With the FP8 model and correct CLIP configuration, expect render times of approximately 13 seconds on 8 GB GPUs.
Method 3: Online Platforms (No Installation Required)
Several platforms offer instant access without local setup:
| Platform | Free Tier | Pricing |
|---|---|---|
| Dzine.ai | Limited | Subscription |
| WaveSpeed AI | Trial | $0.005/image |
| Pixazo | Trial | $0.008/image |
| SuperMaker AI | Yes | Tiered |
Testing Z-Image Turbo: Real-World Performance
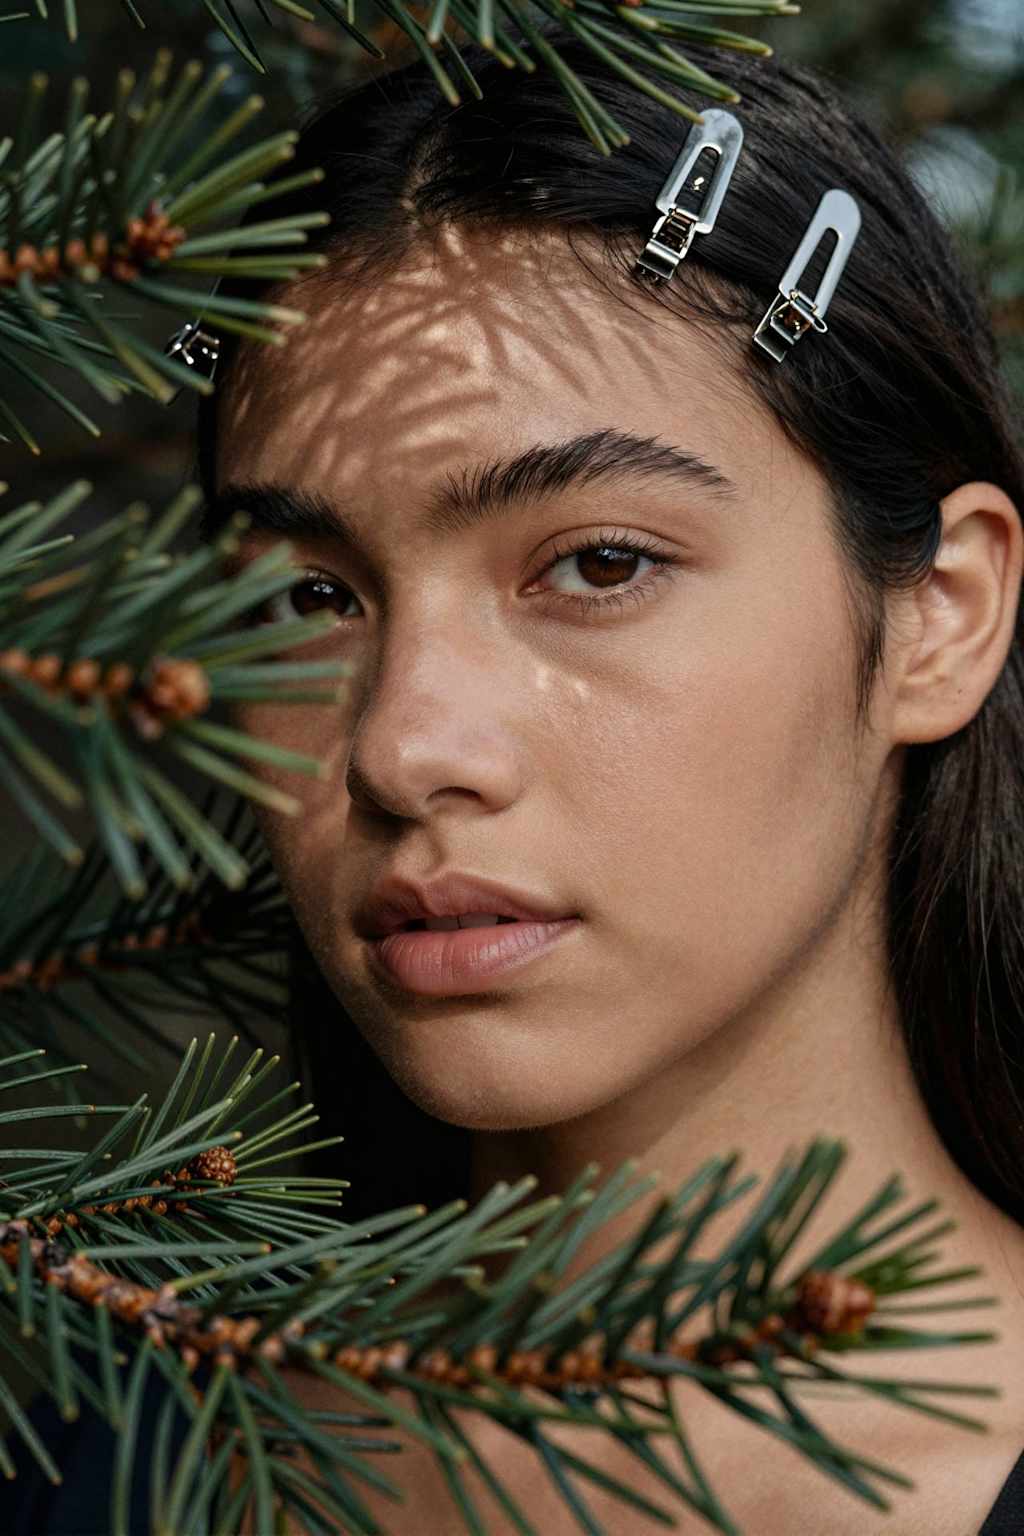
Photorealistic Portrait Generation
Z-Image Turbo excels in portrait generation, producing high-fidelity character images with natural skin textures, proper lighting, and detailed hair. In blind comparisons, users consistently rate Z-Image portraits higher than FLUX for:
- Natural skin textures with film-grain aesthetics
- Consistent lighting with refined shadow handling
- Improved hand anatomy compared to many alternatives
Bilingual Text Rendering Test
One of Z-Image Turbo's killer features is accurate text rendering in both English and Chinese:
pythonprompt = 'A professional business card design with the text "创意设计工作室" and "Creative Design Studio" elegantly displayed, minimalist style, white background, gold accents'
| Capability | Z-Image Turbo | FLUX.1 Dev |
|---|---|---|
| English text | Excellent | Good |
| Chinese text | Excellent | Poor |
| Mixed bilingual | Excellent | Unusable |
| Logo integration | Clean | Inconsistent |
This makes Z-Image Turbo ideal for marketing materials, posters, packaging mockups, and any content requiring embedded typography.
Speed Comparison: Z-Image vs FLUX 2
Direct testing reveals dramatic speed advantages:
| Metric | Z-Image Turbo | FLUX 2 Dev |
|---|---|---|
| Parameters | 6B | 32B |
| Inference Steps | 8 | 20-50 |
| RTX 3060 12GB Time | ~14s | ~172s |
| Speed Advantage | — | 12× slower |
| VRAM (FP8) | ~6GB | ~12GB |
Comprehensive Comparison with Competitors
Z-Image Turbo vs FLUX 2
FLUX 2 (from Black Forest Labs) offers the 32B Dev model as its open-weight option. While FLUX 2 Pro delivers highest fidelity in hosted form, Z-Image Turbo provides compelling advantages for local deployment:
| Feature | Z-Image Turbo | FLUX 2 Dev |
|---|---|---|
| Parameters | 6B | 32B |
| Local Inference | ✓ (16GB VRAM) | Limited |
| Text Rendering | EN + CN | EN only |
| Multi-reference | No | Up to 10 images |
| License | Apache 2.0 | Commercial required |
| AI Arena Rank | #4 | Lower |
Choose Z-Image Turbo for: speed, local control, bilingual content, lower VRAM requirements
Choose FLUX 2 for: multi-reference conditioning, 4MP editing, complex compositions
Z-Image Turbo vs Midjourney vs DALL-E 3
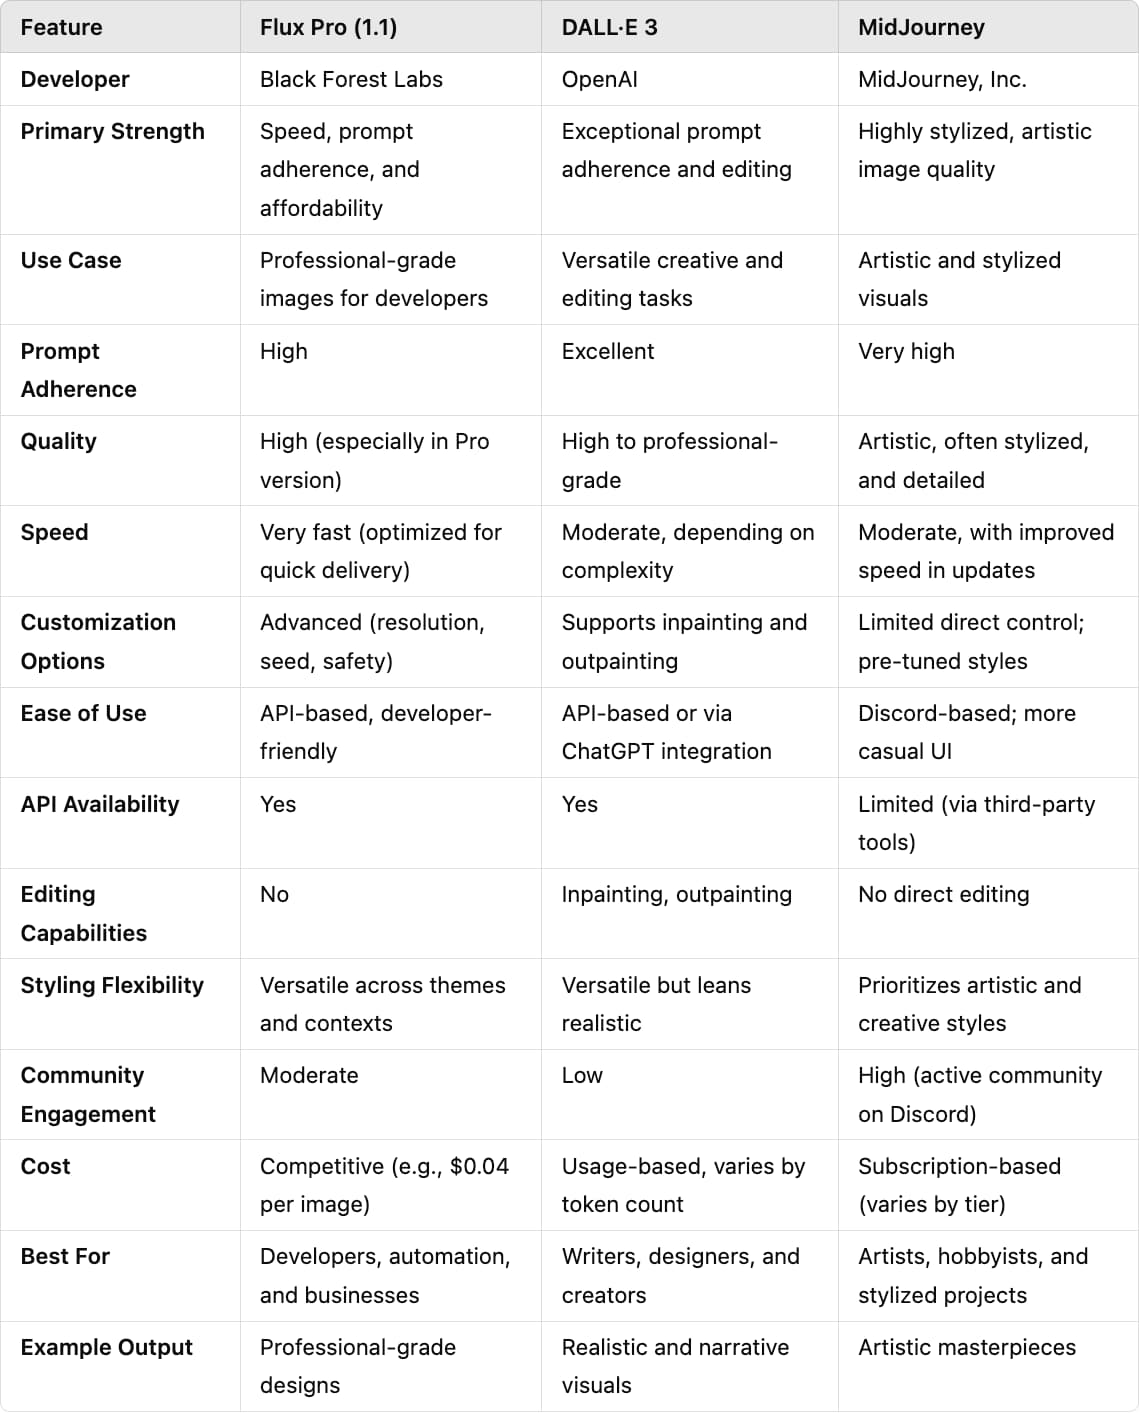
| Feature | Z-Image Turbo | Midjourney V7 | DALL-E 3 |
|---|---|---|---|
| Pricing | $0.005-0.01/image | $10-120/month | $20/month (ChatGPT Plus) |
| Open Source | Yes (Apache 2.0) | No | No |
| Local Running | Yes | No (Cloud only) | No (Cloud only) |
| Text Rendering | Excellent (EN/CN) | Good | Excellent |
| Image Quality | Photorealistic | Artistic/Stylized | Versatile |
| Speed | 2-3s (RTX 4090) | ~30s | ~10s |
Z-Image Turbo vs SDXL Turbo/Lightning
| Feature | Z-Image Turbo | SDXL Turbo | SDXL Lightning |
|---|---|---|---|
| Parameters | 6B | 3.5B | 3.5B |
| Resolution | 1024×1024+ | 512×512 | 1024×1024 |
| Steps | 8 | 1-4 | 2-8 |
| Quality | Photorealistic | Good | Better than Turbo |
| Text Rendering | Excellent | Poor | Average |
| LoRA Support | Pending | Yes | Yes |
Pricing Analysis: API and Self-Hosting Options
API Pricing Comparison

| Provider | Price per Image | Notes |
|---|---|---|
| WaveSpeed AI | $0.005 | Best value, instant API |
| Pixazo | $0.008 | All resolutions |
| Segmind | ~$0.01 | Serverless |
| Z-Image.io | $7.90-31.90/month | Subscription plans |
Self-Hosting Cost Analysis
Running Z-Image Turbo locally offers significant cost savings for high-volume usage:
| Scenario | API Cost (1000 images) | Self-Hosted (RTX 4090) |
|---|---|---|
| Monthly Volume | $5-8 | ~$0.50 (electricity) |
| Annual Savings | — | $54-90+ |
| Initial Investment | None | GPU purchase |
For creators generating 200+ images monthly, self-hosting quickly becomes economical.
Unique Selling Points (USPs) of Z-Image Turbo
1. Unmatched Efficiency
Z-Image Turbo achieves commercial-grade quality with 6B parameters—one-third the size of competing models. This efficiency translates to:
- 5-10× faster generation than FLUX alternatives
- 75% less VRAM requirement than FLUX 2 Dev
- Lower energy consumption per image
2. Best-in-Class Bilingual Text Rendering
No other open-source model matches Z-Image Turbo's ability to accurately render Chinese and English text within images. This makes it invaluable for:
- International marketing campaigns
- Product packaging mockups
- Social media content for global audiences
3. Consumer Hardware Accessibility
The model runs on RTX 3060 6GB cards—hardware many creators already own. This democratizes access to high-quality AI image generation previously requiring expensive cloud subscriptions or enterprise GPUs.
4. Fully Open Source (Apache 2.0)
Unlike Midjourney and DALL-E (closed source) or FLUX (mixed licensing), Z-Image Turbo uses the permissive Apache 2.0 license, enabling:
- Commercial use without royalties
- Model modification and redistribution
- Integration into proprietary products
5. Highest-Ranked Open-Source Model
With an Elo score of 1026 and #4 AI Arena ranking, Z-Image Turbo outperforms Qwen-Image (20B), GPT Image 1, FLUX.1 Kontext Pro, and Ideogram 3.0.
Practical Use Cases and Applications
Marketing and Advertising
Z-Image Turbo's speed and text rendering make it ideal for rapid iteration on campaign visuals:
- Generate 10+ ad variations in under a minute
- Create bilingual banners for international markets
- Produce product mockups with accurate branding
Content Creation
Bloggers, social media managers, and YouTubers benefit from:
- Quick thumbnail generation
- Hero images matching article tone
- Consistent brand visuals without stock photo costs
E-Commerce
Product teams can leverage Z-Image Turbo for:
- Catalog image generation at scale
- A/B testing product presentations
- Creating lifestyle shots without photography
Game and App Development
Developers use Z-Image Turbo for:
- Concept art and character design
- UI/UX visual prototyping
- Asset generation for indie projects
Limitations and Known Issues
Understanding Z-Image Turbo's constraints helps set appropriate expectations:
No Negative Prompt Support
Because CFG guidance is "baked in" during distillation, negative prompts have no effect. This trades user control for speed but can frustrate users accustomed to fine-tuning with negative prompts.
Limited Seed Variation
Identical prompts produce nearly identical outputs regardless of seed. Achieving variation requires substantially different text descriptions.
Position/Perspective Handling
The model sometimes struggles with specific positioning instructions like "from the side" or complex camera angles. This requires more descriptive prompting.
No LoRA Support (Yet)
Community fine-tuning must wait for the unreleased Z-Image-Base model. This limits customization compared to the SDXL ecosystem.
Upscaling Sensitivity
The model requires specific upscaling workflows (Lanczos + shift=7) to avoid artifacts.
Future Roadmap: What's Coming
Alibaba's Tongyi Lab has announced plans for expanding the Z-Image ecosystem:
Z-Image-Base: The non-distilled foundation model will enable community-driven fine-tuning, LoRA training, and custom development.
Z-Image-Edit: Optimized for image-to-image editing tasks with impressive instruction-following capabilities for precise natural language edits.
ComfyUI Integration: Enhanced workflow nodes and ControlNet ports are under active development.
Quick Reference: Installation Commands
bash# Create environment
python -m venv zimage-envsource zimage-env/bin/activate# Install dependencies torch --index-url https://download.pytorch.org/whl/cu124
pip installpip install git+https://github.com/huggingface/diffuserspip install transformers accelerate safetensors# Download model -U huggingface_hub
pip installHF_XET_HIGH_PERFORMANCE=1 hf download Tongyi-MAI/Z-Image-Turbo
Quick Generation Script
pythonimport torchfrom diffusers import ZImagePipelinepipe = ZImagePipeline.from_pretrained(bfloat16
"Tongyi-MAI/Z-Image-Turbo",
torch_dtype=torch.)
pipe.to("cuda")
# Optional: Enable Flash Attention
pipe.transformer.set_attention_backend("flash")
# Optional: CPU offloading for low VRAM
# pipe.enable_model_cpu_offload()
image = pipe(
prompt="Your creative prompt here",
height=1024,
width=1024,
num_inference_steps=9,
guidance_scale=0.0,
generator=torch.Generator("cuda").manual_seed(42),
).images[0]
image.save("output.png")
FAQs
1: What is Z-Image Turbo and how does it differ from FLUX and DALL-E?
A: Z-Image Turbo is Alibaba's open-source AI image generation model released in November 2025, featuring only 6 billion parameters yet delivering photorealistic quality comparable to much larger models. Unlike FLUX (12-32B parameters) and DALL-E 3 (closed source), Z-Image Turbo generates 1024×1024 images in just 2.3 seconds on RTX 4090 GPU, costs only $0.005 per image via API, and supports bilingual text rendering in English and Chinese. It ranks #4 on AI Arena leaderboard with an Elo score of 1026, making it the highest-ranked open-source image model available. Z-Image Turbo uses Apache 2.0 licensing for full commercial freedom, whereas DALL-E and Midjourney impose proprietary restrictions.
2: What are the minimum hardware requirements to run Z-Image Turbo locally?
A: Z-Image Turbo can run on consumer GPUs as modest as an RTX 3060 6GB. For optimal performance, use an RTX 4090 or RTX 3090 with 16GB VRAM. The model's FP8 checkpoint consumes approximately 6GB of VRAM, making it accessible compared to competitors. Minimum CPU RAM is 16GB, though 32GB is recommended. Python 3.9+ with CUDA support is required. On RTX 3060 6GB, expect generation times of 40-70 seconds per 1024×1024 image, while RTX 4090 achieves the same in 2.3 seconds. The model itself requires ~10GB storage space. For extremely low-VRAM systems (4-6GB), CPU offloading enables inference at reduced speed.
3: How do I install and set up Z-Image Turbo on my computer?
A: Installation involves three main methods.
- Method 1 (Python/Diffusers): Create a virtual environment with
python -m venv zimage-env, activate it, install PyTorch viapip install torch --index-url https://download.pytorch.org/whl/cu124, then install dependencies (diffusers, transformers, accelerate, safetensors), and load the model using the ZImagePipeline.from_pretrained() function with torch_dtype=torch.bfloat16. - Method 2 (ComfyUI): Download the FP8 model checkpoint and Qwen 3B CLIP file, place them in ComfyUI folders, configure the workflow with 8 sampling steps, and generate through the visual node interface.
- Method 3 (Online): Use platforms like Dzine.ai, WaveSpeed AI ($0.005/image), or Pixazo ($0.008/image) without local installation. For most users, ComfyUI offers the best balance of ease and flexibility.
4: Why is Z-Image Turbo better at rendering text in images compared to other AI models?
A: Z-Image Turbo excels at text rendering due to its innovative S3-DiT (Scalable Single-Stream Diffusion Transformer) architecture and specialized training on bilingual datasets. The unified token stream architecture allows the model to treat text embeddings with equal importance to visual tokens, rather than treating text as secondary visual content. Most competing models like FLUX and SDXL were designed for primarily visual tasks, leaving text rendering as an afterthought.
5: Is Z-Image Turbo free and can I use it commercially?
A: Yes, Z-Image Turbo is completely free and commercially viable. The model is released under the Apache 2.0 open-source license, permitting unlimited commercial use without royalties or attribution requirements. You can download the model weights from Hugging Face, run it locally on your hardware without paying per-image fees, modify the model for custom applications, integrate it into commercial products, and redistribute modified versions.